Setting up WordPress on Amazon Web Services (AWS) using the Kubernetes package manager, Helm, is straightforward. This guide will walk you through the steps to launch a highly available, scalable WordPress installation in minutes.
Table of Contents
Create EKS Cluster
Create an Amazon Elastic Kubernetes Service (EKS) cluster. This can be done via the “eksctl” command line tool.
curl --silent --location "https://github.com/weaveworks/eksctl/releases/latest/download/eksctl_$(uname -s)_amd64.tar.gz" | tar xz -C /tmp
sudo mv /tmp/eksctl /usr/local/bin
eksctl create cluster Install Helm
Helm is a package manager for Kubernetes, and it is used to deploy and manage applications on a Kubernetes cluster. You can install Helm by following the official Helm installation guide.
sudo yum install openssl -y
curl https://raw.githubusercontent.com/helm/helm/master/scripts/get-helm-3 > get_helm.sh
chmod 700 get_helm.sh
./get_helm.sh
Set Up EBS CSI addon for EKS
First, create an IAM OIDC provider for your cluster.
oidc_id=$(aws eks describe-cluster --name my-cluster --query "cluster.identity.oidc.issuer" --output text | cut -d '/' -f 5)
aws iam list-open-id-connect-providers | grep $oidc_id | cut -d "/" -f4
eksctl utils associate-iam-oidc-provider --cluster my-cluster --approve
Add IAM Role using eksctl
eksctl create iamserviceaccount \
--name ebs-csi-controller-sa \
--namespace kube-system \
--cluster my-cluster \
--attach-policy-arn arn:aws:iam::aws:policy/service-role/AmazonEBSCSIDriverPolicy \
--approve \
--role-only \
--role-name AmazonEKS_EBS_CSI_DriverRole
Then add EBS CSI to EKS by running the following command
eksctl create addon --name aws-ebs-csi-driver --cluster my-cluster --service-account-role-arn arn:aws:iam::111122223333:role/AmazonEKS_EBS_CSI_DriverRole --forceInstall WordPress using Helm
Install the WordPress chart: To install the WordPress chart, run the following command:
helm repo add bitnami https://charts.bitnami.com/bitnamiOnce the chart is added then install WordPress using the below command.
helm install my-wp2 oci://registry-1.docker.io/bitnamicharts/wordpress \
  --set service.type=LoadBalancer \
  --set service.annotations."service\.beta\.kubernetes\.io/aws-load-balancer-type"=nlb \
  --set wordpressUsername=admin \
  --set wordpressPassword=defaultpass \
  --set wordpressScheme=https
This will install the latest version of the WordPress chart from the official Bitnami repository. A default user is created with the username “admin” and the password is set to “defaultpass”.
Horizontal pod auto scaler ( HPA )
Creating a Horizontal Pod Autoscaler (HPA) for your deployment in Kubernetes, such as a WordPress deployment named my-release, involves using kubectl, the command-line tool for Kubernetes. Here’s a step-by-step guide to do this:
Metrics Server: The HPA feature requires the source of a metric, typically the Metrics Server in a Kubernetes cluster. Make sure it’s deployed in your cluster. You can install it via:
kubectl apply -f https://github.com/kubernetes-sigs/metrics-server/releases/latest/download/components.yaml
Creating HPA: Use the kubectl autoscale command to create an HPA. This command will create an HPA that automatically scales your deployment based on specified metrics like CPU or memory usage.
For example, to create an HPA for your my-release deployment that targets an average CPU usage of 50%, use:
kubectl autoscale deployment my-release --cpu-percent=50 --min=1 --max=10In this command:
--cpu-percent=50specifies the target average CPU utilization.--min=1specifies the minimum number of pods.--max=10specifies the maximum number of pods.
Verify HPA Creation: After creating the HPA, you can check its status using:
kubectl get hpaIt’s important to monitor the HPA to ensure it’s operating as expected. You can watch the HPA’s behavior over time with:
kubectl get hpa -wAdjusting HPA (Optional): If you need to modify the HPA parameters, you can use the kubectl edit HPA command:
kubectl edit hpa my-releaseThis will open the HPA configuration in a text editor where you can change parameters like min and max replicas, or CPU utilization targets.
Node Auto-scaling
Achieving node autoscaling in AWS Elastic Kubernetes Service (EKS) is typically done using AWS Auto Scaling Groups (ASGs). Here’s how you can set it up.
Enable EC2 Auto Scaling
- In the AWS Management Console, navigate to the EC2 Auto Scaling section
- Then select the auto scaling group which needs automatic scaling.
- Then go to “Auto matic scaling” Tab and create a dynamic scaling policy.
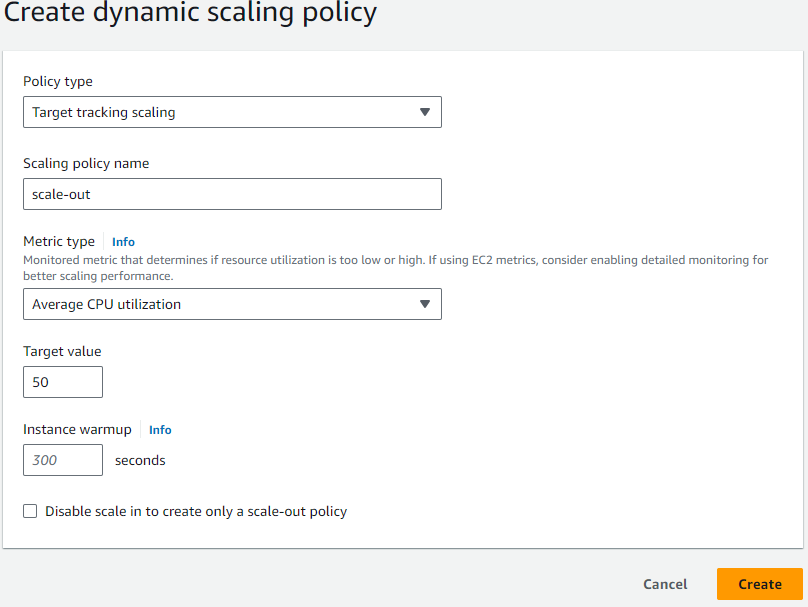
Here is one screenshot given on how to create a dynamic scaling policy.
Click the Create button to create the Dynamic Scaling policy.
SSL Setup
Setting up an SSL certificate for an AWS Classic Load Balancer involves a few steps, including obtaining a certificate, uploading it to AWS, and configuring the load balancer to use it. Here’s a general guide on how to do it:
Obtain an SSL Certificate
First, you need to have an SSL certificate. You can obtain an SSL certificate from a Certificate Authority (CA) like Let’s Encrypt, VeriSign, or any other trusted provider. AWS also provides AWS Certificate Manager (ACM), which can be used to create and manage SSL/TLS certificates.
Using AWS Certificate Manager (ACM)
- Request a Certificate: Go to ACM in the AWS Management Console and request a certificate. You will need to specify the domain names that you want to include in the certificate.
- Validate the Certificate: After requesting a certificate, you need to validate domain ownership. This can be done either through email validation or DNS validation.
- Certificate Issued: Once validated, ACM will issue the certificate.
Set up the Load Balancer
Open the EC2 Console: Go to the Amazon EC2 console.
Select Load Balancers: Under the “Load Balancing” section, select “Load Balancers”.
Choose Your Load Balancer: Select the Classic Load Balancer you want to configure.
Add an HTTPS Listener: In the Listeners configuration for your load balancer, add a new listener for HTTPS (port 443). The instance port chooses the HTTP port 31047
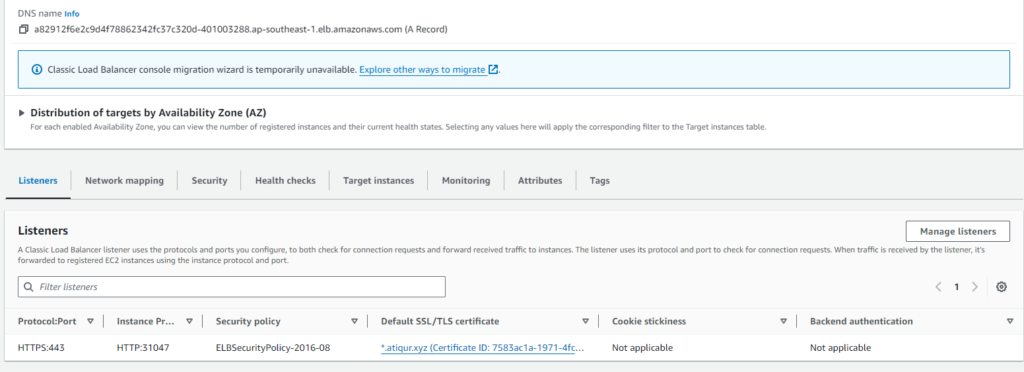
Select SSL Certificate: Choose the SSL certificate you uploaded to IAM or ACM.
Save: Save your configurations.
Update DNS Records
If needed, update your DNS records to point to the load balancer.
Access the WordPress site
After the installation, you can access the WordPress site using the URL provided by the output of the install command. Alternatively, you can go to EC2->Load Balancer and grab the Load Balancer URL from there.
Conclusion
With these steps, you have successfully deployed a highly available and scalable WordPress installation on AWS using Helm. This setup can be easily managed, scaled, and maintained, making it ideal for hosting a WordPress site.
Pingback: How To Setup WordPress In AWS Eks Using Helm – Redoy's Blog
Hi atiq thanks for this blog
I followed this blog https://aws.amazon.com/blogs/storage/running-wordpress-on-amazon-eks-with-amazon-efs-intelligent-tiering/ earlier and when we access wordpress on loadbalalncer it works fine showing wordpress wp admin page
but when we change wpsite url and wp home url to a fqdn we are not able to access it.